Growing moss is an art that demands patience and diligence I discovered during a recent talk at the Toronto Botanical Gardens given by Frank Kershaw, one of my favourite speakers and a gardening guru par excellence. But there are shortcuts. Frank let us in on some fascinating information and unexpected tips for creating a velvety green carpet somewhere in your shade garden. Here are 8 surprising things I learned:
1. Know what’s moss and what’s not.
I thought I knew this one. Moss is moss, right? As it turns out, both Irish Moss (Sagina subulata) and Scotch Moss (Sagina subulata ‘Aurea’) are not mosses at all. They’re really just greatly height-challenged perennials. If you’ve already got some in your garden and you don’t know whether it’s real moss or not, Frank suggested waiting for early spring and noting whether or not they sprouted tiny white flowers. Real mosses don’t have flowers. Irish and Scotch moss do.
Also, unlike real moss, these moss mimics, as Frank calls them, can take moderate foot traffic and you can plant them in full sun or part shade–both Irish and Scotch moss actually don’t do well in full shade. What is cool about these faux mosses, though, is that you can have some fun with them. Because Irish moss is a bright true green and Scotch moss is more golden, you can use the two to create a two-tone tapestry effect. Frank mentioned using them to create a living checkerboard.
2. Don’t believe the planting instructions.
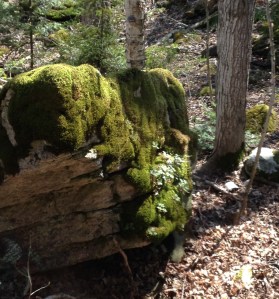
Most plant guides for growing moss will point out that moss prefers soils with low acid pH. But mosses, said Frank, are highly adaptable. I should’ve known this because we have great limestone boulders surrounding our cottage which are covered in a thick layer of luscious mosses. What moss does need is soil that’s loose, friable, easy to drain yet moist (but not wet).
3. Your best moss gardening tools will be a pancake flipper and a narrow pointing trowel.
As Frank brandished his black rubber spatula, I began to see the light. Mosses are very delicate plants with next-to-no root systems–their rhizomes basically function as anchorage. (Mosses get their nutrients from particulates in the air and rainwater, not from the soil.) So transplanting this plant doesn’t involve taking a shovel and digging it up. If you’ve got permission to harvest some moss from someone’s property, the spatula is your best tool for carefully peeling sheets of moss off the surface it’s been living on, be it rock or dead tree trunk.
The pointing trowel, a tool used to smooth mortar between bricks, is ideal if you want to plant moss in the slim spaces between pavers. You take your sheet of moss, cut it into thin strips using large scissors and then, after placing a strip between the pavers, use the pointing trowel to gently nudge the moss strip into position and make contact with the soil.
4. Be a clean freak before you transplant your moss.
In Frank’s words, “You need a clean substrata.” The soil has to be swept of any debris–no sticks, stones or leaves. This includes the narrow spaces between pavers. This is because the small pores in a smooth soil surface are the easiest entry points for a moss’ teeny tiny rhizomes to attach, thus speeding up the establishment process.
5. Give stones and angels a long dunk.
You’ll also have much better success establishing moss on a rock or stone sculpture if their surfaces are moist and well pitted. Frank gave the example of his own experience trying to encourage moss to grow on a small cement angel. He literally tossed the angel into the fish pond in his back garden and left it there for a whole year. When he finally fished it out, it was nicely pitted and completely sodden–perfect for moss growing.
6. Mosses aren’t the hungry types.
In the wild, “mosses aren’t used to being fed,” said Frank. Avoid chemical fertilizers. In fact, said Frank, you can burn moss very easily with fertilizer. And if you can, use rainwater rather than chlorinated tap water to keep the moss moist.
7. Use a gentle hand when grooming.
A metal tined rake is probably the worst tool you can use to get rid of leaves and other debris landing on your moss carpet. You can easily tear up whole patches. And a leaf blower going at full force can peel up your lovingly grown moss at the blink of an eye. Instead, Frank recommends said evil leaf blower turned down to 1/4 the speed and gently huff the leaves away.

8. And be prepared to micro-weed.
“Mosses are great incubators,” said Frank. Given that they are living mattresses, complete with cozy comforters, this should come as no surprise. But all the scattered weeds and seeded flowers that pop up in your green incubator, er, moss carpet, still do surprise. And annoy. There’s no way around it. You have to get down on your hands and knees and micro-weed. But Frank has one trick for keeping your moss at least partially protected from unwanted plant babies. “Don’t plant your moss in direct contact with your lawn or you’ll be picking out grass blades,” he said.
Frank warned the class at the very beginning of his talk that growing moss takes time. “It will take a year to three or four years to get coverage. It takes time to knit together. This is not instant gardening” he said. But when it comes to growing moss, the process can be just as rewarding as the outcome, whether you aspire to creating your own Moss Temple (like the world famous Koke-dera in Kyoto) or simply coaxing a small shady spot into an enchanted woodland.
For a terrific Art of Moss Growing guide, including garden design ideas and how to propagate moss, check out Moss: the Garden’s Magic Carpet, written by Frank for a 2014 edition of the Lee Valley & veritas® newsletter.


Pingback: Jazz up a woodland garden | Ministry of the fence
Pingback: For ever greens, indoors and out | Ministry of the fence
Pingback: Starting a stumpery | Ministry of the fence
Pingback: Put a little country in your city garden | Ministry of the fence
Pingback: A fern with attitude | Ministry of the fence
Pingback: A garden unfolds into rooms with eye-popping views | Ministry of the fence
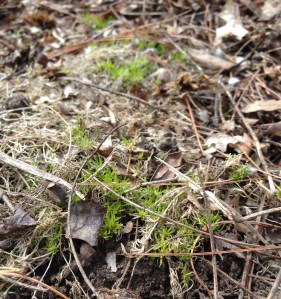
Interesting post. I’m very fond of moss. I have some growing spontaneously between/on some pavers, but I’ve been thinking of trying to get it to grow in a shady spot where grass does not do well.
LikeLike
I was impressed with all of Frank’s examples of moss being used as a ground cover and as a lawn substitute. But he cautioned everyone about the amount of time and patience it takes to establish moss and keep it pristine. I have some growing at the base of a large maple tree and I wish it would take over more area but it seems quite content in its little niches amongst the exposed roots of the tree.
LikeLike